Implementing a brainfuck CPU in Ghidra - part 1: Setup and disassembly
- Setup and disassembly (current post)
- Decompilation of pointer and arithmetic instructions
- Decompilation of I/O and control flow instructions
- Renaming the analyzer and adding a manual
- Recognizing common patterns (future post)
More posts may be added to this series in the future.
Ghidra supports quite some processors out of the box, but if you come across a somewhat obscure architecture, chances are you’ll have to write the processor module yourself (if someone else hasn’t published it on the internet already). At first glance, it may seem daunting: it’s not clear where to start and the documentation is often lacking. That’s why I decided to write this blog post series. The goal is to create a Ghidra processor module for a compiled version of the esoteric programming language brainfuck, from scratch. The sources I used are the Ghidra Language Specification1, the Compiler Specification2 and the source code3.
Brainfuck
Brainfuck is a very minimal language consisting of only eight instructions. See the wikipedia page for a full description of the language. My brainfuck variant deviates slightly from the original:
- The memory array is called
rammemory and consists of0x1000016-bit cells. The pointerptr(16-bit) points to the current cell. -
Instructions are compiled to a binary format, using the following translation table:
Instruction Opcode >0x0<0x1+0x2-0x3.0x4,0x5[0x6]0x7Compiled instructions are 8-bit wide. The four least significant bits make up the opcode, the other bits are unspecified and should be set to zero.
- Compiled instructions live in
rommemory. The program counterpc(16-bit) points to the current instruction.
I created a simple brainfuck compiler (bfc.py) that takes a brainfuck file and outputs a binary. Non-instruction characters (anything but ><+-.,[]) are interpreted as comments and will not be compiled. I didn’t bother to write a VM that executes compiled brainfuck, although it wouldn’t be hard to write yourself. (If you do, I’d love to see it.)
Let’s compile a simple program to see the compiler in action. mul2.bf takes some user input, multiplies it by two and prints the result. The source code is as follows:
,          store user input in #0
[>++<-]    #1 = #0 * 2
>.         move to #1 and print its content
Compile it to mul2.bin and show the generated binary:
$ ./bfc.py mul2.bf mul2.bin
$ hexdump -C mul2.bin
00000000  05 06 00 02 02 01 03 07  00 04                    |..........|
0000000a
The rest of this blog post series will be dedicated to reversing and analyzing compiled brainfuck binaries like mul2.bin.
Preparation
We’ll be using Eclipse to create the processor module. After installing Eclipse, we’re ready to add the GhidraDev extension to Eclipse. The extension can be found in Extensions/Eclipse/GhidraDev/ in the Ghidra installation directory, along with some documentation on how to install this extension. The extension can be added by opening the Help → Install New Software... menu in Eclipse and selecting the GhidraDev zip. The documentation covers this in more detail.
Although we’re using Eclipse for development, you can use any other IDE of your preference for editing the files. I recommend VS Code with the SleigHighlight extension for syntax highlighting of .slaspec files. XML syntax highlighting of .ldefs, .pspec and .cspec files is done in VS Code by marking them as XML in the bottom right corner. This is not required, it just eases the development of processor modules.
Creating a project
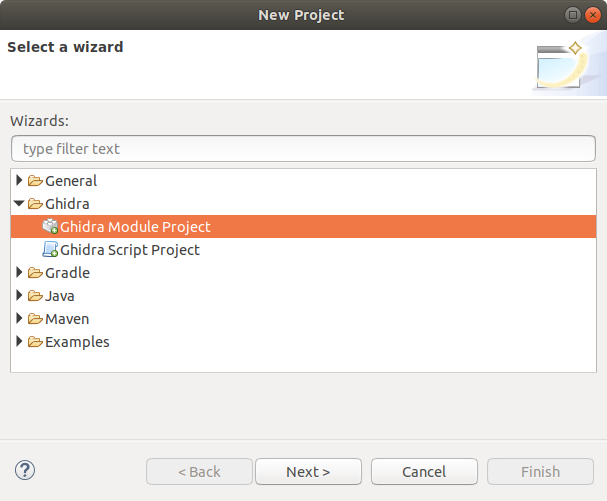
Create a new project by going to File → New → Project and select the Ghidra Module Project wizard 🧙.

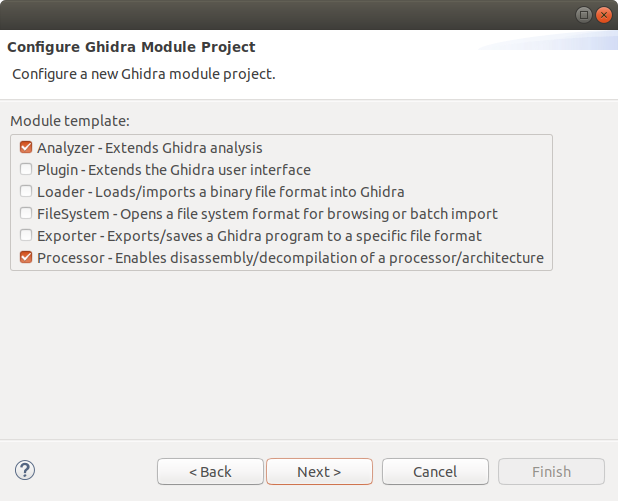
Specify a name and directory for this project and hit next. The next screen lets us choose the components we want the wizard to add to our project. We only need the analyzer and the processor. Disable the others.

If you haven’t used Eclipse with Ghidra before, you’ll need to specify the root directory of your Ghidra installation and hit next. The last step lets us enable Python support. We don’t need this, so leave the checkbox unchecked.
Then hit finish. We’ve now created our Ghidra project!
Creating the language definitions
The processor lives in data/languages. The wizard has already populated this folder with definitions for the (hypothetical) skel processor, which are of no use to us. Delete these files.

In Ghidra you don’t define processors, but languages instead. A language specifies a variant of a processor family. For example, x86.ldefs contains specifications for 16-bit, 32-bit and 64-bit variants of the x86 processor architecture. Ghidra interprets all files with an .ldefs extension as a language definitions file4. The format of this file is not really documented, but there is an XML schema file (written in RELAX NG) that describes the structure of .ldefs files: language_definitions.rxg. Using this schema we can compose brainfuck.ldefs (create a new file using Right click on languages → New → File):
<?xml version="1.0" encoding="UTF-8"?>

<language_definitions>
    <language processor="brainfuck"
              endian="little"
              size="16"
              variant="default"
              version="1.0"
              slafile="brainfuck.sla"
              processorspec="brainfuck.pspec"
              id="brainfuck:2:default">
        <description>brainfuck</description>
        <compiler name="default" spec="brainfuck.cspec" id="default"/>
    </language>
</language_definitions>
There is only one variant of the brainfuck processor, so we only specify one language. The <language> tag has a few required attributes that define the most important properties of the processor variant. One thing to note is the processorspec attribute. This attribute points to a .pspec file, which specifies the processor. The file specified in the .sla file is responsible for providing Ghidra information about the disassembly and decompilation of machine code. Optionally, you can add a processor manual using the manualindexfile attribute. This will be covered in a future post.
A <language> tag must contain a <description> subtag and at least one <compiler> subtag (but you may specify more). The <compiler> tag points to brainfuck.cspec, which describes specific information about the compiler. There are some other tags you can include, but they are not interesting for now.
The processor specification
The structure of the .pspec file is described by processor_spec.rxg. There is no official documentation. The file can contain a bunch of tags describing the memory and registers of the processor, all of which are optional. We’ll leave it empty for now:
<?xml version="1.0" encoding="UTF-8"?>

<processor_spec>
</processor_spec>
The compiler specification
The layout and purpose of the .cspec file is pretty well5 documented in the Compiler Specification:
The compiler specification is a required part of a Ghidra language module for supporting disassembly and analysis of a particular processor. Its purpose is to encode information about a target binary which is specific to the compiler that generated that binary. Within Ghidra, the SLEIGH specification allows the decoding of machine instructions for a particular processor, like Intel x86, but more than one compiler can produce those instructions. For a particular target binary, understanding details about the specific compiler used to build it is important to the reverse engineering process. The compiler specification fills this need, allowing concepts like parameter passing conventions and stack mechanisms to be formally described.
Only the <default_proto> tag is required. This tag describes the default calling convention (prototype) for this compiler. Brainfuck has branches, but it doesn’t have calls, so there is not really a prototype. We create a prototype as minimal as possible:
<?xml version="1.0" encoding="UTF-8"?>

<compiler_spec>
    <default_proto>
        <prototype name="default" extrapop="unknown" stackshift="0">
            <input></input>
            <output></output>
        </prototype>
    </default_proto>
</compiler_spec>
Be sure to read the Compiler Specification and compiler_spec.rxg for more detailed information.
The language specification
The .sla file describes the instruction set and makes it possible for Ghidra to disassemble and decompile binaries. The file contains information for both disassembly and decompilation. The file describes the translation from machine code to a textual representation of each instruction (mnemonic, operands, etc.) for the disassembly. It also describes how these instructions affect memory and registers using an intermediate language called p-code. P-code operations operate on varnodes, which are generalizations of memory. A CPU register is a varnode, as well as a word or halfword in memory. The information in the .sla is used by the decompiler to construct the decompiled code.
Writing .sla files manually is very tedious. (Just look at 6502.sla if you don’t believe me.) Luckily, you don’t have to write .sla files by hand. You can write .slaspec files instead, which are much more pleasant to write and maintain. (Compare 6502.slaspec to 6502.sla in terms of readability.) These .slaspec files are automatically compiled to .sla files by Ghidra.
The .slaspec is very well documented by the Ghidra Language Specification, so I will not go too deeply into the syntax of the .slaspec. Refer to the official specification for that.
The very first step is to create brainfuck.slaspec. Ghidra will compile this to brainfuck.sla, which is referred to by the .ldefs.
.slaspec files always start by defining the endianness of the processor, usually followed by an instruction alignment definition. The brainfuck processor is little endian and instructions are aligned to a 1-byte boundary (which is equivalent to no alignment, but let’s define it anyway):
define endian=little;
define alignment=1;
The next step is to define the address spaces:
define space register  type=register_space  size=2  wordsize=2;
define space ram       type=ram_space       size=2  wordsize=2;
define space rom       type=ram_space       size=2  wordsize=1  default;
This is rather straightforward, except for one thing: the Ghidra Language Specification mentions the space type rom_space, but this type does not exist6. Using this space type will result in a crash. That’s why rom is defined as ram_space, instead of rom_space.
The rom space is marked as default. This causes the binary to be loaded into the rom space. Note that the registers get their own address space.
Then we define registers in the register space:
define register offset=0x00 size=2 [pc ptr];
We can refer to these defined address spaces and registers in the instructions, but before we can define those instructions, we have to define a token. A token specifies the layout of an instruction or a part of it (in variable length instructions). Instructions in the brainfuck instruction set are very simple. The four least significant bits ([0,3]) define the opcode of the instruction. The other bits are undefined. Our token looks like this:
define token instr(8)
    op = (0, 3)
;
We can now finally define the instructions themselves. For now we’ll only define the translation from machine code to the textual representation (disassembly) and not their semantics (decompilation). This is very simple. The > instruction looks like this:
:> is op=0x0 {}
Let’s break this down. The : indicates that this ‘translation’, more formally called a constructor, should be added to the root instruction table. All instructions live in this table. Subtables can be used for constructing more complex instructions, which you can read about in the Ghidra Language Specification.
After the : comes the textual representation, formally called the display section, of the instruction. For this instruction, this is simply >. If an instruction has operands they can also be specified here (add op1, op2, for example).
The display section is followed by the is keyword, which itself is followed by the bit pattern section. The bit pattern section is used to match the bits of the machine code to constructors. The bit pattern section for this instruction (and all other brainfuck instructions) consists of one constrain: the opcode is 0x0. No more is needed to identify the > instruction.
Constructors end with a semantic section, surrounded by curly braces ({}). This section describes how instructions manipulate memory and registers. We leave it empty for now.
All constructors for compiled brainfuck instructions can be defined like this:
:> is op=0x0 {}
:< is op=0x1 {}

:+ is op=0x2 {}
:- is op=0x3 {}

:. is op=0x4 {}
:, is op=0x5 {}

:[ is op=0x6 {}
:] is op=0x7 {}
Testing
This is all that’s needed to describe the language, processor, compiler and instruction set. We can now test it. Hit the debug button in the toolbar to start a debugged instance of Ghidra with our module automatically loaded in.

Create a new project in Ghidra and give it a name. Now we need a brainfuck file to disassemble. I’ll be using the previously generated mul2.bin. Drag the binary into Ghidra and open it with the code browser. Ghidra asks if it should analyze the file. It doesn’t matter whether you choose yes or no, because we haven’t told Ghidra how to auto-analyze brainfuck binaries. Nothing will happen if you click yes.
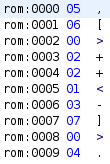
The listing view shows the bytes of our binary. To disassemble them press D at the first address. The listing will now show the disassembly of our binary, which should look similar to this:

Hooray! We’ve now created an overcomplicated brainfuck disassembler that could be replaced by a few lines of python code. This seems like a huge overkill, but in the next post we’ll look at getting the decompiler to work so we can do some real reversing on brainfuck binaries. See you then!
You can find the final code for this post here.
Footnotes
-
See
docs/languages/in your Ghidra installation. Online (compiled) version available here. ↩ -
See
Ghidra/Features/Decompiler/src/main/doc/in the source code. You’ll have to compile these yourself (see issue #472). Online (compiled) version available here. ↩ -
NationalSecurityAgency/ghidra on GitHub, commit
eaf6ab2. It may not be the latest commit by the time you’re reading this. ↩ -
The
SleighLanguageProvideris responsible for finding and parsing these.ldefsfiles. ↩ -
AFAIK, the following valid tags are not documented in the Compiler Specification:
spacebase,deadcodedelay,segmentop,resolveprototype,eval_current_prototypeandeval_called_prototype. Some of them are documented elsewhere. There might be other subtle differences between the docs and the code. ↩ -
See
space_class.java. Onlyregister_spaceandram_spaceare defined. ↩